Tuesday, March 30, 2010

Very Basics of Toon Boom Cont-2

Hey ! Hope you will like. I hope that you learned a lot of fundamentals both about animating in general and animating in TBS in specific. Ok lets come to today’s tutorials. In this article  we will learn how to import the same image files into a "drawing" element into what is called a "vector box". Then we will cut up and separate the boxers into different "drawing elements" and so on.
I hope you followed everything. If so, then you now know how to import the image files into "drawing elements". You have learned to use the import and vectorize with textures command to create "vector box" versions of your images. You learned to use the Reposition all Drawings tool to scale and flip and move all the cells in a "drawing" element at the same time, in future we will need it. You also learned how to cut the boxers apart and put them into separate elements so they can be animated independently.

Ok, Now we will separate the shadows from the boxers similarly to the way we separated the boxers. Then we will set the rotational pivot points for each element and then we will use keyframing to animate some additional action.It is a really simple animation sequence and I left you plenty of creative room to experiment on your own after you work through the basic tutorial. As always I'm available for answering questions either directly via e-mail or here on the blog or at the discussions area of the web www.javednoor.com.
Now I am, introduced to some fundamental concepts of animating and animation production. You will learn about the major work areas in Toon Boom Studio and get a better understanding for why they exist and why they are separated. You will also get some very enlightening insight into the make-up of the animation stand and how analogous.

Saturday, March 27, 2010

Very Basics of Toon Boom.

I was reciped few of email that want to know very basic using toonboon. Then I start this article by step by step. If you know knothing or you didn’t here the name of ToonBoom this is absolutely no problem. Just read and follow my instruction.

Very Basics of Toon Boom.
This the beginning of a new "Very Basics" steps for Toon Boom Studio. I plan on covering in detail many of the fundamental concepts of working with . In this very basic you will learn about some of the differences between "image" elements and "drawing" elements and little bit of so on. You will learn how to import images into "image" elements , how to import images into "drawing" elements, how to use the "set exposure" command to adjust and tweak the timing of an animation sequence and how to cut up and animate your imported images. It is a very detailed tutorial and after you have read through it once or twice you are encouraged to actually do the work yourself because that's the best way to learn. Please read the article more and more as you need.
Imported anyimage into Photoshop and cut out each pose, placed them on to transparent backgrounds and saved each one as a PNG formatted image file.
Then we will adjust the timing of that sequence to learn more about how to use the timeline in our animating.
If you followed along through the first image you see, then you now know how to import image files into a sequence in an "image" element, how to slow down the overall animation by adding more frames to the sequence and how to use the Set Exposure command to adjust and tweak the timing of your animation sequence.

Wednesday, March 24, 2010

ToonBoon Tutorials: Floating Window Mode


Floating Window Mode
The floating window system is familiar to users who have worked with other versions of Toon Boom Studio. Floating windows can be repositioned as you work.
To set your preferences to floating windows:
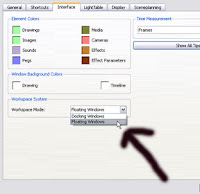
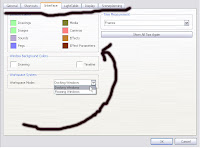
􀀗Select Edit > Preferences. Click on the Interface tab. Under Workspace System, set the Workspace Mode to Floating Window.
To reposition a floating window:
􀀗Click on the heading of a floating window and drag it where you want it.
To adjust the size of a floating window:
􀀗Click and drag the window’s borders. Be careful not to resize a window in a way that hides any of its information.

Sunday, March 21, 2010

dock a window

To dock a window:
􀀗Click on the heading of a floating or docked window and drag it where you want it to dock (the left side, right side, top or bottom). Hover for a moment and Toon Boom Studio will automatically create a space for the window. Release the mouse button and the window will snap into place.
􀀗Double-click on the header of a floating window and it will be docked automatically.
To undock a window:
􀀗Click on the heading of the docked window and drag it to another spot in the interface. Once your window appears to be floating, release the mouse button.
􀀗Double-click on the header of a docked window and it will become a floating window
To position a window above, below, beside, or between other docked windows:
􀀗Click on the heading of a floating or docked window and drag it where you want it to dock. Hover for a moment and Toon Boom Studio will automatically create a space for the window. Release the mouse button and the window will snap into place.
To create docked windows that are staggered
􀀗Click on the heading of a floating or docked window and drag it on top of the window you want it to be tabbed with. Hover for a moment until the existing window is shaded. Release the mouse button and the window will be placed over the other(s) and a tab will be created.

To avoid automatic docking:
􀀗You may try to move a floating window, only to have Toon Boom Studio make it a docked window. To prevent this, hold down [Ctrl] as you click and drag the floating window to any position.

To adjust the size of a docked window:
􀀗Click and drag the window’s borders.
To show or hide floating windows:
􀀗You may want to quickly show or hide your floating windows. Press [Tab] on your keyboard and the floating windows are hidden. Press [Tab] again, and they reappear.

Docking and Floating Window Modes


Docking and Floating Window Modes
Toon Boom Studio allows you to easily move the various windows to create a working environment that is tailored to your own needs. You can select which windows are displayed from the Window menu.
There are two ways to display windows in the user interface:
•Docking Window Mode
•Floating Window Mode
Docking Window Mode
When you are working in the Docking Window mode, you can have all of your windows docked, or use a combination of docked and floating windows. You can dock a window on the left side, right side, top or bottom of the interface. A window can be positioned above, below, beside, or between existing docked windows. You can also create a staggered effect in which two or more windows occupy the same spot on the interface, with tabs to switch between them.
A window that is already docked can be repositioned to match your preferences. The program automatically adjusts the size of the docked windows to optimize the display.
To set your preferences to Docking Window mode:
􀀗Select Edit > Preferences. Click on the Interface tab. Under Workspace System, set the Workspace Mode to Docking Window.

Saturday, March 20, 2010

Customize the Workspace

Customize the Workspace
You can create customized workspaces that include the toolbars and views relevant to your work and animation style. You can also create a workspace that is unique to the task at hand, for example, one workspace for drawing and another for animating.
Workspace Drop-Down Button
Use the Workspace drop-down button for quick access and easy management of your workspaces.
Click on the Workspace button to display a drop-down menu that lists your workspaces, including the Default and Drawing workspaces. This menu also contains commands for creating and saving a new workspace, as well as renaming, restoring, or deleting an existing one.
If the Workspace drop-down button does not appear in your workspace, you can easily include it. Simply select Window > Toolbar > Workspaces.
See Also
Setting up Your Studio Session on page 35
Windows
To add or remove windows from a workspace
􀀗Click on the Window menu and select the desired view. A checkmark appears beside the views that are displayed in the workspace.
􀀗The views can be docked by clicking and dragging them between two existing docked views, or they can be left floating. To remove a view from the workspace, deselect it from the list, or click on the X in the view’s upper right corner.
Full Screen
When you are working in Toon Boom Studio, you may want to work in full-screen mode. From there, you can hide your toolbars and windows in order to focus on the drawing. Your full screen preference is saved with your workspace, so that the next time you load it, it is already displayed as you had it. It can be quite useful to save both a full screen version and a regular layout of a workspace.
To turn full-screen mode on:
􀀗Select View > Turn Full Screen On or use the default keyboard shortcut [Ctrl]+[F].
To turn full-screen mode off:
􀀗Select View > Turn Full Screen Off or use the default keyboard shortcut [Ctrl]+[F].

Display Toolbars in Workspace.

Display Toolbars in the Workspace
By default, Toon Boom Studio displays certain toolbars in the main window. You can customize your session to display only the toolbars that are useful to your project.
The following toolbars are available:

•Drawing: allows you to access the tools used for drawing and painting.
•Scene Planning: allows you to select the tools used for arranging your scene.
•Main: allows you to start, open, or save animation projects; cut, copy and paste content; and access the online help.
•Interactive Playback: allows you to control the playback of your scene.
•Grid Control: allows you to display grids in the Drawing View window.
•Onion Skin: allows you to view the previous or next drawings in a sequence
•Peg: allows you to display/hide details about the peg path.
•Scene View: allows you to change what you see in the View windows.
•Workspaces: allows you to switch between workspaces, as well as create, save, rename, restore, and delete workspaces.
•Exposure Sheet: appears in the Xsheet view, allows you to add and manage elements in the exposure sheet
To add or remove toolbars from a workspace:
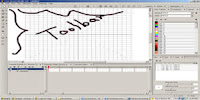
􀀗Select Window > Toolbar or right-click on any toolbar and select Toolbar from the pop-up menu. Select the desired toolbar from the list. A checkmark appears beside the toolbars that are displayed in the workspace.
􀀗Toolbars can be moved and rearranged by clicking and dragging them with the mouse. They can be docked on the left side, right side, top or bottom of the workspace.

Thursday, March 18, 2010

Toon Boom-(Class-1) Workspace Functionality

Workspace Functionality

Toon Boom Studio is designed to be flexible enough to adapt to your computer setup as well as your personal flair, allowing you to customize your workspace. A workspace is a collection of information from the current user interface. The workspace contains information on all of the windows’ and toolbars’ positions and states.
Toon Boom Studio allows you to create, modify, and save an unlimited number of customizable workspaces in order to organize your project and optimize your work. For example, you may create a workspace that includes the Drawing View and Exposure Sheet for when you are drawing, and another workspace that includes the Camera View, Side View, Timeline and Function Editor for when you are animating. The workspaces that you create and save can be accessed no matter what project you are working on.
The active workspace is always denoted by a checkmark in the list of workspaces.
With Toon Boom Studio, you can:

•Select a Workspace
•Create a Workspace
•Save a Workspace
•Rename a Workspace
•Restore a Workspace
•Delete a Workspace
•Display Toolbars in the Workspace
•Customize the Workspace
•Reset the Workspace


Most of these commands can also be accessed through the Workspace drop-down button.
Select a Workspace
To select a workspace:
Select Window > Workspaces and click on the desired workspace. A checkmark appears next to the selected workspace.
Create a Workspace
To create a workspace:
Select Window > Workspaces > New Workspace. A Layout Name dialog box opens. Name your workspace and click on OK.
Note: When you create a workspace, it automatically takes on the layout that you were
using when you created it. If you had a workspace that had already been modified (i.e.,
you added and moved toolbars), the new workspace will include these changes.
Save a Workspace
To save the current workspace:
Make sure that the workspace that you want to save is the active workspace. Select Window > Workspaces > Save.
Rename a Workspace
To rename the current workspace:
Make sure that the workspace that you want to rename is the active workspace. Select Window > Workspaces > Rename.
Restore a Workspace
If you have modified and saved on of the default workspaces, you can return to its original layout with the Restore Workspace command.
To restore a workspace:
Select Window > Workspaces > Restore Workspace.
Delete a Workspace
To delete the current workspace:
Make sure that the workspace that you want to delete is the active workspace. Select Window > Workspaces > Delete. The default workspace is now displayed

Wednesday, March 17, 2010

Launching Toon Boom Studio


Launching Toon Boom Studio
To get started, you need to start the Toon Boom Studio application and open a project.
You have three main types of tasks you can do after you launch the program, each of these are explained in the following sections.
•Creating A New Project
•Opening An Existing Project
•Opening Tutorials
•Accessing Web Resources
To launch Toon Boom Studio:
1.Do one of the following:
•Double-click on the Toon Boom Studio icon.
Toon Boom Studio opens. The menu bar and the main toolbar are displayed.
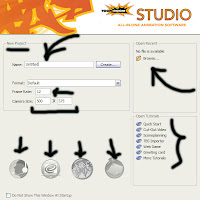
When you first launch Toon Boom Studio, the Welcome Screen appears. Use the Welcome Screen to:
•Enter a name for your new animation
•Select preset animation properties
•Set manual animation properties
•Open recent files
•Browse to open a project
•Open tutorials online or locally on a hard drive
•Access Web resources:
Toon Boom Studio Technical Support Web Page
Toon Boom Studio Product Web Page
eLearning Web Page
Toon Boom Studio User Forum

Tuesday, March 16, 2010

Chapter 1 Toon Boom Studio Basics

Toon Boom Studio Basics
This chapter describes how to start a new animation in Toon Boom Studio, how to work with scenes and how to set up your windows, toolbars and other preferences.
This chapter contains the following topics:
•Launching Toon Boom Studio
•Workspace Functionality
•Docking and Floating Window Modes
•Starting Your Animation Project
•Saving Animation Projects
•Setting the Animation Frame Rate and Camera Size
•Adding Scenes to a Movie
•Setting up Your Studio Session

Getting Started with ToonBoon

Getting Started
After launching Toon Boom Studio, you can begin creating an
animation project. Data for each animation project is stored in a file
folder that you name when you first create it. Once you open a new
or existing project, you will be able to work on it in the Toon Boom
Studio interface.
Launching Toon Boom Studio
To open Toon Boom Studio:
1. Double-click on the Toon Boom Studio icon.
Toon Boom Studio opens. The menu bar, the main toolbar and
welcome screen are displayed.
There are other ways to launch Toon Boom Studio depending
on your operating system:
• Windows users can select Start > Programs >
Toon Boom Animation > Toon Boom Studio 4.5.
• Mac OS X users can select Applications >
Toon Boom Studio > Toon Boom Studio 4.5.
The welcome screen allows you to open a new or existing animation
project and access e-Learning tutorials.

Monday, March 15, 2010

Installing Toon Boom Studio.

Installing on Windows

If you have a Windows operating system on your computer, install
Toon Boom Studio using these simple steps.
1. Start the installation program. Do one of the following:
• If you downloaded Toon Boom Studio from our website,
extract the files and double-click on setup.exe to run the
installation program.
• If you received Toon Boom Studio on a CD, insert the it into
your CD drive. An auto-run screen appears from which you
can launch the installation program.
• If the auto-run feature of your CD drive does not start
automatically, browse the contents of the CD and doubleclick
setup.exe to run the installation program.
2. Just follow the onscreen instructions to complete the
installation. That’s it!

Installing on Mac OS X

If you have a Mac OS X operating system on your computer, install
Toon Boom Studio using these simple steps.
1. Start the installation program. Do one of the following:
• If you downloaded Toon Boom Studio from our website,
double-click the disk image and drag the Toon Boom Studio
icon to the Applications folder.
• If you received Toon Boom Studio on a CD, insert the CD
into your CD drive. Double-click on the CD and drag the
Toon Boom Studio icon to the Applications folder.
2. Follow the onscreen instructions to complete the installation.
That’s it!

Thursday, March 11, 2010

Welcome to Toon Boom Studio.

Toon Boom is a software near to your dream.
Toon Boom Studio, the leading animation software for individuals,
features powerful drawing tools, time-saving lip sync tools, and
innovative 3D layout and animating tools.
This guide includes the following topics:
• New and Improved Features
• Check Your System Requirements
• Installing Toon Boom Studio javascript:void(0)
• Getting Started

Tuesday, March 9, 2010

A simple example

The screen is blanked to a background color, such as black. Then a goat is drawn on the right of the screen. Next the screen is blanked, but the goat is re-drawn or duplicated slightly to the left of its original position. This process is repeated, each time moving the goat a bit to the left. If this process is repeated fast enough the goat will appear to move smoothly to the left. This basic procedure is used for all moving pictures in films and television.
The moving goat is an example of shifting the location of an object. More complex transformations of object properties such as size, shape, lighting effects and color often require calculations and computer rendering instead of simple re-drawing or duplication.

Monday, March 8, 2010

Computer animation or CGI animation.


Computer animation (or CGI animation) is the art of creating moving images with the use of computers. It is a subfield of computer graphics and animation. Increasingly it is created by means of 3D computer graphics, though 2D computer graphics are still widely used for stylistic, low bandwidth, and faster real-time rendering needs. Sometimes the target of the animation is the computer itself, but sometimes the target is another medium, such as film. It is also referred to as CGI (computer-generated imagery or computer-generated imaging), especially when used in films.
To create the illusion of movement, an image is displayed on the computer screen and repeatedly replaced by a new image that is similar to the previous image, but advanced slightly in the time domain (usually at a rate of 24 or 30 frames/second). This technique is identical to how the illusion of movement is achieved with television and motion pictures.


Computer animation is essentially a digital successor to the art of stop motion animation of 3D models and frame-by-frame animation of 2D illustrations. For 3D animations, objects (models) are built on the computer monitor (modeled) and 3D figures are rigged with a virtual skeleton. For 2D figure animations, separate objects (illustrations) and separate transparent layers are used, with or without a virtual skeleton. Then the limbs, eyes, mouth, clothes, etc. of the figure are moved by the animator on key frames. The differences in appearance between key frames are automatically calculated by the computer in a process known as tweening or morphing. Finally, the animation is rendered.

Saturday, March 6, 2010

How to start an animation (Very basic of animation tutorial )


Welcome to my 1st Blog tutorial animations class. If you want create animation then it is good if you have better knowledge of GRAPHICS.So here are i am trying to give you some help for you. To Simply be courage you can draw! I think you can hold or can move a mouse. If not no problem. You must can. Believe me. Ok, Let start.
This operation for those who use Windows Operating System (like 2000, XP, Vista etc).

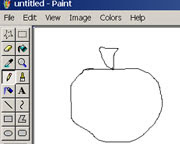
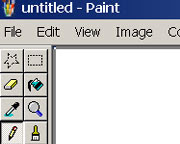
Click in your desktop start button. Ok , there is a list- go to the “All Programs” and select “Accessories” then there is a pop-up menu select “Paint”. Very fine!

Now you can see there is a working area and some tools in left side.


Hold your left side mouse in working are and look! There are a line which is following your mouse. Un press your mouse, now you can click to “Eraser” tools beside your left corner. Come on the working are where were you draw something. Now press and hold the mouse and follow the line you draw. See, it is very easy.
Try again, try again and try again with other tools. Thank you.

Thursday, March 4, 2010

A simple example of animation.

The screen is blanked to a background color, such as black. Then a goat is drawn on the right of the screen. Next the screen is blanked, but the goat is re-drawn or duplicated slightly to the left of its original position. This process is repeated, each time moving the goat a bit to the left. If this process is repeated fast enough the goat will appear to move smoothly to the left. This basic procedure is used for all moving pictures in films and television.
The moving goat is an example of shifting the location of an object. More complex transformations of object properties such as size, shape, lighting effects and color often require calculations and computer rendering instead of simple re-drawing or duplication.

Wednesday, March 3, 2010

Computer animation

Computer animation (or CGI animation) is the art of creating moving images with the use of computers. It is a subfield of computer graphics and animation. Increasingly it is created by means of 3D computer graphics, though 2D computer graphics are still widely used for stylistic, low bandwidth, and faster real-time rendering needs. Sometimes the target of the animation is the computer itself, but sometimes the target is another medium, such as film. It is also referred to as CGI (computer-generated imagery or computer-generated imaging), especially when used in films.
To create the illusion of movement, an image is displayed on the computer screen and repeatedly replaced by a new image that is similar to the previous image, but advanced slightly in the time domain (usually at a rate of 24 or 30 frames/second). This technique is identical to how the illusion of movement is achieved with television and motion pictures.
Computer animation is essentially a digital successor to the art of stop motion animation of 3D models and frame-by-frame animation of 2D illustrations. For 3D animations, objects (models) are built on the computer monitor (modeled) and 3D figures are rigged with a virtual skeleton. For 2D figure animations, separate objects (illustrations) and separate transparent layers are used, with or without a virtual skeleton. Then the limbs, eyes, mouth, clothes, etc. of the figure are moved by the animator on key frames. The differences in appearance between key frames are automatically calculated by the computer in a process known as tweening or morphing. Finally, the animation is rendered.
For 3D animations, all frames must be rendered after modeling is complete. For 2D vector animations, the rendering process is the key frame illustration process, while tweened frames are rendered as needed. For pre-recorded presentations, the rendered frames are transferred to a different format or medium such as film or digital video. The frames may also be rendered in real time as they are presented to the end-user audience. Low bandwidth animations transmitted via the internet (e.g. 2D Flash, X3D) often use software on the end-users computer to render in real time as an alternative to streaming or pre-loaded high bandwidth animations.
Contents

• 1 A simple example
• 2 Explanation
• 3 Methods of animating virtual characters
• 4 Computer animation development equipment
• 5 The future
• 6 Detailed examples and pseudocode
• 7 Movies
• 8 Amateur animation
• 9 Architectural animation
• 10 See also
o 10.1 Animated images in Wikipedia
• 11 References
• 12 External links

Tuesday, March 2, 2010

History of animation.

Animation is an art form which, in its modern appearance, appeared alongside the development of film. Earlier attempts at making drawings move were only experimental. Animations has a long history. Contents 1 Early Animation 1.1 Precursors to Animation 2 Victorian parlor toys 2.1 Zoetrope (180 AD; 1834) 2.2 The magic lantern 2.3 Thaumatrope (1824) 2.4 Phenakistoscope (1831) 2.5 Flip book (1868) 2.6 Praxinoscope (1877) 3 The present 3.1 Traditional animation 3.2 Feature-length films 3.3 Stop motion 3.4 CGI animation 4 The future 4.1 Animated humans 4.2 Cel-shaded animation

Monday, March 1, 2010

Basic of animations.

There are four basic techniques to be used in animation. These are:
Drawn animation
Cut-out animation
Model animation or stop motion animation
Computer animation or computer generated imagery (CGI)
Drawn animation-- Drawn animation, also termed as traditional animation and classical animation, is the oldest and historically the most prevalent form of animation. In a traditionally-animated cartoon, each frame is drawn by hand.This encloses any form, where one drawing is put back by another in a progression. Each drawing is somewhat unusual from the one which is placed before.

Animated films are made up of thousands of drawings, depicted on screen very rapidly one after the other. It works in the same manner as the flip book does.
Cut-out animation-- The world's earliest known animated feature film was cutout animations, made in Argentina by Quirino Cristiani. By using flat characters, such as--strings, stiff fabric, props and backgrounds cut from materials such as paper; and by using buttons, matchsticks or even photographs, you can create cut-out animation. It embraces any figure of animation where cut-out forms be in motion or substitute by the other cut-outs.
Model animation or stop motion animation-- Model animation is a form of stop motion animation designed to merge with live action footage to create the illusion of a real-world fantasy sequence.

By using materials, such as--clay, wire that can be bent or formed into another shape, you can create model animation. This engrosses the filming of puppets or any other form of three-dimensional models. Before moving slightly and screening, it is placed, filmed and than these shots are placed jointly as a section of the film and will give the hallucination of moving models.
Computer animation or Computer Generated Imagery (CGI)-- Computer animation is the skill of building the moving images by means of computers. This refers to the portrayal of three-dimensional models and locations on the computer. Images can be scanned into the computer via digital photography or made within the computer itself.

To produce the delusion of movement, an image is presented on the computer screen which is swiftly put back by the new image that is alike to the preceding image, but shifted to some extent. Computer animation is basically a digital successor to the art of stop motion animation of 3D models and frame-by-frame animation of 2D illustrations.

In a method known as--Tweening or Morphing, the variations in appearance between the key frames are automatically considered by the computer and finally Animation is rendered at the end.

Simple be courage “You can”

If you can see or think then you will make or create a cartoon or animation.
Simple be courage “You can”. Ok Let start…
First read the blog slowly. Ready..
Cartoon is nothing but movement of some images .Ok let me example, think about your hand, there is five fingers and it still now move your hand. What you see? It’s call animation. So it is very easy,is not it?

Animation Basics of 3D

There is a great demand for good quality 3D animators, this is because although animation itself is not very difficult to learn, it is the application of the learning which makes the big difference. Acquiring finesse and applying one's animation skills to create high quality and effective images is a quality that only come from dedicated practice.

3D Animation is primarily of two kinds -

1.Keyframe Animation and

2.Motion Capture


Keyframe animation is a very old technique. In fact it is so old that one can find examples of it which go as far back as the 1600 B.C. Surprised? You shouldn't be because keyframing refers to the simple technique of making a series of sketches of a character or object in which the position of the subject changes just a little in each successive frame. When this series of frames are displayed rapidly one after another the viewer gets the illusion that the subject is moving. Many readers of this article might have come across keyframe animation in the form of flip books. In 3D animation the process of making keyframes has been made a lot less tedious and quicker. Animators nowadays don't have to manually create all the frames required for an animation sequence. They only create a few selected keyframes, say the beginning, middle and end portions of a sequence and then let animation software fill in the rest of the frames.
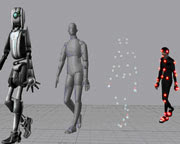
Motion capture took some time getting adapted as the technology took longer to develop compared to keyframe animation. But now it is gradually becoming popular and is being used in filmmaking, as well as video games. The advantage of motion capture is that it is a much faster process compared to keyframing. In motion capture the subject is usually a human actor who is made to wear special suits that contain sensors which record their movements. The actor already has a virtual 3D counterpart in a computer. The data captured by the motion sensor suit is transferred to the 3D character which then moves accordingly. However there are some problems with motion capture. Firstly it is a very expensive technology and costs can run into many thousands of dollars. This is why those who learn motion capture generally use motion capture data from commercial motion capture libraries. The other drawback of the technology is that more often than not the results are not perfect and the animated sequences need to be worked upon by keyframe artists to make them appear real. This especially happens when the 3D model does not have a human form, like it generally occurs in animation films in which lead characters can be insects and animals, as well as objects.

Those who intend to build a career in the field of 3D animation should go beyond learning to use various software packages. It is more important for them to develop a deep understanding of motion, movement, and facial expressions of both humans and animals. Keen observation is an important quality for animators. They should observe and study life around and practice expressing their observations through sketches. They should not limit their education to only the field of animation but also study other arts like film, theatre and comic books. Classic 2D animations are a great way to begin learning 3D animation. The works of important animation artists of yesteryears like Walt Disney and Ken Anderson can still serve as a valuable educational resource for a 3D animator.

Know how to make animation.

This blog is those people who loved animations. If you went to make a animation then just start.

You will find how much easy to create an animations. If you can hold a mouse or can movement a cursor then you can make animations.Yes!